There's just not enough time between Thanksgiving and Christmas. My friend Meredith and I were talking about how we really need another month. If Christmas were on January 25th I could get it all done. Each year there's more to do, more fun to be had, and far less time which explains why I'm blogging about my Christmas decor after Christmas!
This year on the Christmas decorating front, I felted balls to hang over the dining room, made stockings from a coffee bean burlap sacks and some old pillow cases, spray painted some pine cones shimmering pink, and found dozens of pink, gold and teal Christmas bulbs at Scrap SF to coordinate our tree with our new Living Room rug.
 |
| I picked ornaments to match our new area rug which has pale peachy-pink and pale teal colors in it. |
 |
| My friend Noelle taught me how to make felt balls. I strung them over the dining table. |
 |
| Shimmering pink spray painted pine cones bring the pink theme into the dining room. |
My kids kept asking me to hang our stockings but I just couldn't. Each one was a different color-- purple, green and two fire engine reds-- and none of them matched our decor. They would have looked terrible. Plus, we don't have a mantle in the living room. I decided to make use of a coffee burlap sack I picked up from an antique store in Petaluma last summer and make my own stockings. I had just enough burlap from one sack to make four, just what we needed.
I decided to line them with old white pillow case fabric so they're nice and soft inside and the creamy white peaks through the lose knit sacks. I used fabric glue to attach the faux fur that I picked up from Mendel's on Haight Street. I found the perfect size gray ribbon to attach to the stockings for hanging from some old Laurie b clothing tags I had lying around.
All-in this project cost me $23 total-- $15 for the burlap sack and $8 for 1/4 yard of faux fur. Not bad for 4 stockings! And, it didn't take me very long to make them. I stitched on the pillow case fabric first. Then I folded the fabric and traced one of my existing stocking feet to get the shape of the foot right. I stitched that up and then inside-outed it and glued on the fur. Easy!
 |
| Steve calls these Eskimo boots |
With no mantle, I created this "brantle." This perfectly sized branch is from Michaels Craft Store. I nailed some funky, cut spike nails from Paxton Gate onto the branch and hung it with clear fishing wire looped onto picture molding hooks for easy set-up and removal.
 |
| This Santos Cage Doll was an early Christmas present for myself. |
 |
| I found tons of the perfect pink Christmas ball ornaments at Scrap SF. |
 |
| I also found a big piece of burlap at Scrap to throw around the trunk. |
 |
| Did you catch this beauty in the background? My dress form changes with the holidays. Noelle surprised me with this festive tree topper. $8 at Target! |
Now for the felt balls! Noelle talked about felting, felting, felting for weeks and I just couldn't picture what she had in mind. I guess she picked up on my lackluster interest and felted away one Saturday afternoon without me. When I saw what she created I just had to do it myself too! And this is what I ended up with...
|
It's like modern garland!

The felting process is easy but time consuming. Like Noelle, I spent an entire Saturday afternoon felting away. First, I went to Urban Fauna Studio in San Francisco to pick up the supplies I needed. |
 |
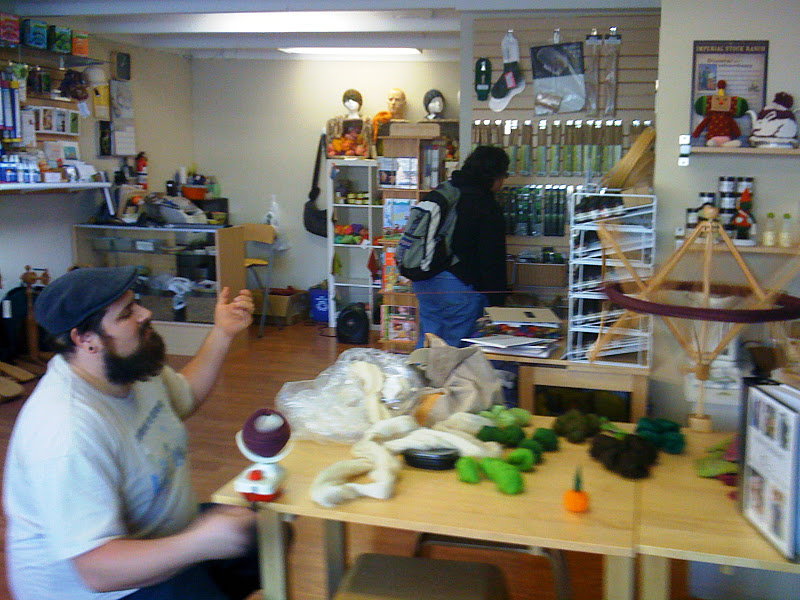
| Urban Fauna Studio. I think the nice man shown here is the owner. |
 |
| Full of cute items made from felt. Who knew? |
 |
| I picked my felt colors from these jars. |
 |
| This is what I walked away with for my project. I spent around $35. |
DIY1-2-3: Making a Felted Wool Ball "Christmas Garland"
 |
| Step 1: Take a white base color felt and create a ball about the size of a clementine. Roll some additional colored felt over it and shape into a ball, poking with this special needle. The more you poke, the rounder it gets. |
 |
| This is one of the most creative felt balls my sister Michelle made |
 |
| As you can see, the balls are far from perfectly round. It's OK because they firm and shape up in the washing and drying process. |
 |
| Step 2: Place the felt balls into an old panty hose and tie knots in-between the balls. Don't tie them too tight because you place them in the hot cycle in the washing machine and then in the clothes dryer. If the knots are too tight, it's hard to get the felt balls out. (I didn't want to cut the panty hose because I didn't have enough of it. I had to do two separate washes to make 75 balls). |
 |
| Step 3: Pull the balls out of the panty hose. They will stick a little so you have to tug. The tugging helps make them fuzzy. I grouped them by color so I could vary them along the string. You just take some thread and a big needle and poke them through to create the look you want. No need to tie the balls onto the string. They stay put for the most part. |
 |
| Per Noelle's suggestion, I spaced my balls about 8-10 inches apart |
 |
| So pretty |
Since we're on the top of crafting and sewing I thought I'd show you another reason why there's not enough time between Thanksgiving and Christmas. I whipped up this little purse/tooth fairy pillow for my daughter one afternoon with leftover scrap fabric I had lying around. I had everything I needed on hand to make this little purse pillow in an hour.
I simply sewed some scrap fabric together in a long rectangular shape, stitched on a zipper, and sewed it all together. Next I made a pillow insert. Then I hand stitched a button on one side to loop the purse strap on and then stitched the purse strap onto the other side. I did this so you can tuck the purse strap into the purse if you want to use it as a pillow only. Lastly, I sewed a little pocket on the outside for the tooth.. Viola! A tooth fairy pillow purse!
It was such a big hit, I made one for my daughter's best friend, my niece and then I made a tooth fairy snake pillow for my son. By the time we were finished with all this crafting, my dining room was a wreck. My son said, "Mom! This is the biggest mess I've ever seen you make!"
But, not as big a mess as making a ginger bread house!
 |
| No, this isn't our gingerbread block. These gingerbread ladies are on display at the Academy of Science. We didn't have enough time for gingerbread houses this year at our house. (But really, I just wasn't in the mood for the mess.) |
The last big holiday decorating project was another suggestion from Noelle. After I saw her amazing Christmas tree fully dressed just days after Thanksgiving (which I will photograph for you on New Year's Eve), I was in the mood for pink. Noelle told me exactly where to find tons of pine cones in Golden Gate Park and she picked up the perfect pink spray paint for me at a local craft store. (FYI: They don't have metallic pink spray paint at the paint store. It's at the craft stores).
 |
| One |
 |
| Two |
 |
| Three |
I hope you enjoyed my crafty Christmas decorating projects.
Happy Holidays!